• Choose a month

  • Rapt in Awe

    My Journey through the Astronomical Year

    Think of this as a "companion text" to this, the main web site. Not required reading, butI hope you'll find it interesting and helpful.

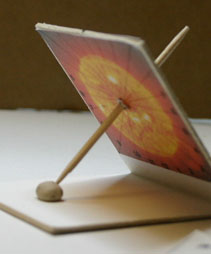
Build an inexpensive, simple, one-tooth-pick, global, equatorial, elegant and smaller than an iPod, wristdial!

A day in the Sun – a brief timelapse video of the garden-size version of the wristdial in action. (See if you can discover what time did the bird land on the dial, casting it’s shadow on the face!)  This is the same basic design as the wrist dial, only larger.

Is the wristdial really all those things – inexpensive, simple, one-tooth-pick, global, equatorial, elegant and smaller than an iPod? Yes, and with no moving parts to break. Instead it depends on the motion of the Earth which, ponderous as it is (6.6 sextillion tons) moves like – well, like clockwork!

And simple?

Yep! Here’s an image of the final product in action in the northern hemisphere early on a summer morning.  (Oh, it can also find north for you, so it can double as a compass. More on this in the full directions in PDF format 😉

composite_main

Click for larger image.

The wristdial travels in a neat, folded package (see inset at upper left). The toothpick is inserted at a right angle to the dial face, and this can be checked with the “setting triangle.” The same triangle is then used to set the dial face so its plane points to the celestial equator. Get those two set correctly, and the dial works anywhere on Earth that the Sun is shining.  clay_winterThe dial has two faces, the one shown in the preceding picture is for use in spring and summer. The other side –  shown in the picture at right – is for use in fall and winter. The design can easily be scaled up and faces are included for a larger version, or you can use the instruction included here to design your own.
Sundials are simple things that point to profound truths about the motions of Earth and Sun. They’ll teach you about your position on this rapidly spinning sphere and put you in direct touch with some awesome forces of nature. That’s what I love about them. But right now you’re probably more interested in how to make your own wristdial, so let’s do it!

You can download the full directions – with many color photos – from the link below. This is a large Acrobat PDF file, so allow several minutes for it to download.  Because of the numerous color image, I suggest you read  it on screen – but you’ll want to print either page 4 or page 5, depending on the hemisphere in which you will use the dial.

Download complete directions for wrist dial here: directions_wristdial_f4

You might want to get a jump on things by first finding and jotting down a few useful facts.

Latitude and longitude (http://www.getlatlon.com/) – You don’t have to be super precise. All can be rounded to the nearest degree. For Westport, MA I round my latitude to 42° N, and my longitude to 71° W.

Central meridian (http://www.travel.com.hk/region/timezone.htm) – Time zones are set every 15 degrees of longitude so you’ll see the central meridian for yours at the top of the map on the web page linked above. Westport, MA, is in the Eastern Standard time zone which is centered on 75 degrees longitude.

Compass deviation (http://www.geo-orbit.org/sizepgs/magmapsp.html) – I suggest you find your compass deviation only because I’m assuming you might use a magnetic compass to find north. If you have another way to determine north, you can ignore this. But a magnetic compass is not precise. In the case of Westport, MA the deviation is 16° east, which means that if my magnetic compass says it is pointing north, it is really pointing 16 degrees to the west of north, so to point true north I have to correct by pointing 16 degrees to the east of what it says is north. Of course, I might use a GPS, or call the local airport to learn the compass deviation.

Southern hemisphere dial at work in winter.

Southern hemisphere dial at work in winter.

The wristdial has now been tested in the southern hemisphere by my friend Dom in Sydney, Australia. Dom took some photos of his wristdial in action, next to a larger, traditional garden sundial in Centennial Park.  You will note three things about these photos. First, the shadow is on the underside of the dial face because when these photos were taken in mid-July it was winter in the southern hemisphere. Second, the time indicated by the dial is almost exactly the same as the time indicated by Dom’s watch. That’s because Sydney is not on daylight savings time in the winter. Also. Sydney’s longitude is just one degree – four minutes – east of the central longitude for its time zone.   Because of that the time should be four minutes fast. But, the equation of time for July  is six minutes slow. When you apply the equation of time,  the four minutes “fast” caused by a difference in longitude is subtracted from the six minutes “slow” of the equation of time and the dials solar time is within about two minutes of standard clock time.  (This kind of calculation is described in detail  for your location in the directions you can download. )

Southern hemisphere wristdial showing solar time as compared to clock time while sitting on a traditional sundial in a park in Sydney, Australia.

Southern hemisphere wristdial showing solar time as compared to clock time while sitting on a traditional sundial in a park in Sydney, Australia.

Choosing and using binoculars for astronomy

What binocular should I get to view objects in the night sky? The short answer is almost any binocular will help, but if you’re looking for a one-size fits all answer, get a good 10X50 binocular. Of course, one-size doesn’t fit all, so here’s some background that I hope will help you find the correct answer for you.

Binoculars are an incredible way to extend your reach into astronomy and while I recommend everyone start by observing with the unaided eye, binoculars make a wonderful next step. There are a handful of astronomical objects that are best seen with binoculars and a lot more that become more interesting and beautiful if you point binoculars at them.

Binoculars are essentially a pair of low-power, wide-field telescopes that are easy to carry and easy to use. As with any telescope, their main purpose in astronomy is to gather more light allowing you to see fainter objects. If your naked eye view of the stars ends with stars of magnitude 5, binoculars can extend that view to magnitude 9 or even 10. There are approximately 2,800 stars of magnitude 5 or brighter that can be seen with the naked eye. But use binoculars and that number jumps to roughly a quarter million of magnitude 9 or brighter stars and more than half a million stars at magnitude 10 or brighter. So you see, binoculars make a huge differences!

Binoculars are commonly identified by two numbers representing their power and the diameter of their objective lens. For astronomy, the best all around choice – in my opinion – is 10X50 binoculars. The first number means the binoculars magnify 10 times – which means essentially you instantly cut the distance between you and astronomical object by a factor of 10! The second number refers to the diameter of the objective lens in millimeters.

This last is an indicator of how much light the binoculars gather – and thus how faint the object is that you can see with them. This number is a bit deceptive because what is important is the light gathering area of the lens. Let’s take a look at two simple examples to see how this changes.

To begin with, the eye of an older adult typically opens to about 5 mm.(Yes, the eye of a teenager may open to 7mm or more – but this quickly changes with age in most people.) Let’s assume 5 mm is the norm. This figure means the light gathering area of your eye is roughly 20 square millimeters. A 40 mm binocular lens has a light gathering area of 1256 square millimeters – more than 60 times that of your eye. A 50 mm binocular lens has an area of 1,962 square millimeters – roughly 100 times that of your eye. Notice the big jump between the 40 mm and the 50 mm lens. Area goes up much faster than diameter.

The power number is also important, but only for putting a high end to things. It’s easy to add power to a binocular, but even a person in excellent physical condition can not hold a high-powered binocular steady. In fact, I believe that any binocular above 10X needs to be put on a tripod for a steady view – and that decreases its ease of use tremendously. Frankly, even a 10X binocular can reveal a little more if put on a tripod. I would favor binoculars a bit below 10 power generally, but there’s a catch.

There is no sense bringing more light to your eye than your eye can use. The light from a binocular is focused in a cone known as the exit pupil. Exit pupil – the diameter of this cone as it enters the eye – is easy to determine. Just divide the power into the diameter of the lens. Thus a 10X50 binocular has an exit pupil of 50 divided by 10 which is 5 mm. That 5 mm exit pupil matches the dark-adapted eye of the typical adult and that’s why I recommend this as the limit.

Popular 7X50 binoculars provide an exit pupil of 7 mm. Since this is much larger than the pupil of your dark adapted eye, you actually will see less with these binoculars at night then with a 10X50 pair. The lenses are the same size and they gather the same amount of light – but with the 7X50 binoculars that light is put in such a large cone that nearly half of it misses your eye. Suddenly the 50 mm lens is acting more like a 30 mm lens in terms of the faintest star it shows you!

The last number that is critical is eye relief. This too is in mm and you want something that provides at least 15mm of eye relief. This number simply represents the distance your eye should be from the binocular lens. It becomes especially important for people who wear glasses and only then if you have to wear glasses because of astigmatism. If astigmatism is not the issue, you should simply take your glasses off when using binoculars. Focusing the binoculars will correct your vision. But for convenience sake, some people like to leave their glasses on. With your glasses on you can not get your eyes real close to the binocular eye lens and this may mean that you lose a significant portion of the field of view and light that is gathered. You want binocular designed so that when wearing your glasses you still get the full use of them and this is why you want an eye relief of at least 15 mm.

So does this mean that everyone should purchase 10X50 binoculars for use in astronomy? Absolutely not. Your rule should be this:

Purchase the largest binoculars you can comfortably hold whose exit pupil is lower than 5.

Binoculars get heavy quickly as you turn your head upwards and peer at the sky searching diligently for a star cluster or nebula. And heavy binoculars can just be a pain to carry around all evening.

So, for example, 7X35mm binoculars do not collect nearly as much light as 10X50. But they are still an excellent choice for many people because they are much lighter and because it is easier to hold 7X binoculars steady than 10X ones. Notice that the exit pupil is exactly 5mm – that is 35/7 equals 5. Similarly, 8X40 make an excellent choice.

Don’t get fanatic about these numbers. Any binoculars will help you see more.

Choosing binoculars for astronomy, by the way., doesn’t preclude their use for other activities, such as bird watching. And sometimes their ability to do well in dim light – while critical for astronomy – is also very helpful when looking for a bird or deer in twilight.

Finally, whatever binoculars you choose, do learn how to use them. Most binoculars have a central focusing knob and most people simply hold them up to their eyes and focus them with this knob alone – and this is a mistake.

When you first use a pair of binoculars you should do this:

  1. Aim at a distant object, close your right eye and focus with the central focusing knob using only the left eye and thus the left side of the binocular.
  2. Once focused that way, don’t touch the central focusing knob. Instead, close your left eye and use the diopter adjustment on the right binocular eyepiece (just twist that eyepiece, it turns while the other one doesn’t) to make sure the view through the right side is in perfect focus.
  3. Thereafter you simply use the central focus with both eyes open for any objects you wish to focus on.

It is the second step that is usually ignored – but when you ignore it you are not getting the most out of your binoculars. It’s a bit of a bother, but our two eyes are seldom the same. And binoculars adjusted this way for one observer will not work at their best for another observer. Usually binoculars are a personal item that are used by a single observer. But if someone hands you a pair of binoculars to observe with, you should first adjust them in this two-step process for your vision. Then when you hand them back to their owner, it is polite to remind them that you have changed the diopter adjustment and they will need to change it back.

Of course, they may not know what you are talking about when you say this. I’m amazed at how many people who own binoculars are unaware of this. In that case, you can be helpful and explain it to them.

To sum up:

  • Make sure you’re comfortable with the weight of the binoculars you choose.
  • Get the largest diameter objective lens you can comfortably carry and hold.
  • Don’t exceed 10X magnification for handheld binoculars.
  • Don’t exceed a 5mm exit pupil unless you are young and know your dark adapted eye opens wider than 5mm.
  • If you must wear glasses, make sure the binoculars you choose offer enough eye relief so that wearing glasses does not cut down on your field of view.

A few things to generally avoid:

  • Binoculars with a ruby coatings on their lenses.
  • Zoom binoculars
  • Very wide field binoculars

My personal choice for astronomical observing are 12X36 Canon image stabilized binoculars. If you have been following closely you’ll see this violates the power rule – but only because I’m willing to pay a premium price for a good image stabilization mechanism. before I owned these I had a pair of 15X45 image stabilized binoculars, but I found that while these were excellent astronomy glasses, I frequently did not use them. They were simply too large and bulky for me to want to carry them all the time, or to hold them to my eyes for extended views. So I sold them, sacrificing power and light grasp for a pair that were smaller, but that I use much more often.

And that brings us to the final rule that applies to all astronomical instruments, including telescopes: The instrument that’s right for you is the one you use the most. Don’t get obsessed with the numbers game. Be aware of it, but choose what works for you.